
*** This post contains affiliate links ***
I don't decorate very much for holidays or seasons; I have a cat that likes to jump up on furniture and shelves to knock things over, and two little girls who like to play with our decorations. One of the things that I do like to display is a seasonal wreath on my door. I like having a decorative welcome and something that makes our door a cheerful entry to our home.
This wreath is very easy to make. It will take about five or ten minutes for you to attach the different decorations onto the wreath. I am not great with bow making skills, so I will include a few links that you can visit to learn to make different bows. Alright, let's get started.

Materials Needed
fall picks
artificial leaves in autumn colors
wood decoration of your choice (owl was mine and only available at a JoAnn's store)
Burlap covered wood ornament (dual color bought at Hobby Lobby)
Americana Paint - French Mocha
Homemade letter stencil
Hi Temp Glue Gun Mini
glue sticks
There are many different bases you can use for your wreath, but for fall I like to use the grapevine wreath. I like the natural look of the woven twigs with the orange, yellow, and brown colors.
My first step was to paint letters on the the small burlap covered wooden pumpkins. I made a stencil with the letters that would make it possible to stencil "HAPPY FALL" on the pumpkins. I carefully stenciled the letters on the pumpkins and let them dry.

Before I start to glue my pieces onto the wreath, I arrange them in a few different ways to see how it will look. I decide which way looks best to me, then I start to glue the pieces onto the wreath. I use the high-temp glue gun when I make my wreaths. That insures that the pieces will stay attached to the wreath when it is outside and exposed to the elements, especially wind.
I glued the pumpkins on first, arranging them to run from the top left side of the wreath over and down the right side. Next I glued the artificial leaves to the bottom left side of the wreath. I added a few of the autumn picks that have what looks like little berries on them. They come in large or small bunches. I chose a small one where I could move the berries in a spread out pattern.
Next I added the cute wooden owl. I thought it would look nice nestled on the wreath with the colorful leaves as a background.

The last thing to do was make a bow out of the wired ribbon and put it on the wreath. This I didn't attach with hot glue. I wrapped floral wire around the back of the bow, then secured it to the grapevine wreath.
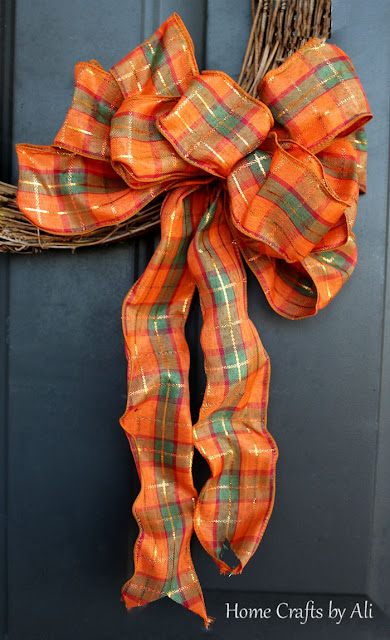
I made this wreath last year, so I can't remember the exact tutorial I followed to make this bow. I am going to put links in to the two tutorials I have pinned on Pinterest that make a bow that looks like mine.
How to Make a Big Bow for a Wreath (step by step with pictures)
How to Make a Triple Floral Bow (step by step with illustrations)

There is my Happy Fall wreath decorating my door. It makes me happy to walk up to my door and see my wreath.

I hope you found this tutorial useful to give you an idea on how you can decorate a grapevine wreath to make a fun fall wreath for your front door.
If you are interested in another wreath project I worked on, visit my Patriotic Wreath so you can plan for next year.
I love your wrath. My kids have been asking about making one. If our Jo-Anne store still has the same owl I would be very excited because I love owls. Pinning
ReplyDeleteI'm so glad you liked this! I think your Jo-Ann's should have the owl. I bought mine last year, but just went back this morning and bought another one. Good luck!!
ReplyDeleteThe letters make this so unique! I love it! Thanks for linking up to The Alder Collective. Your post has been pinned to our party board, too. We hope you'll join us next Tuesday at 8 EST!
ReplyDeleteThank you for your nice words Abby! I'll see you next week for another link party.
DeleteHow cute! You've motivated me to start my Fall decorating! Happy Autumn!
ReplyDeleteThis is so pretty! That little owl is adorable!
ReplyDelete