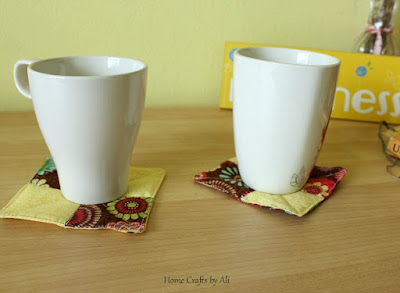
These coasters are great to have for your home, make as a housewarming gift to a new neighbor, or to include in a gift box with mugs and drinks. Once you have made a few of them, these will be a quick little project to work on.
I made these coasters to send to my book & a cuppa swap partner, Wendy. She said that her favorite colors were yellow and brown, so I went to JoAnn's to see what fabrics I could find in those colors. I like the way the light yellow contrasts with the darker brown. The flowers on the brown fabric added a nice pop of color too.
Let's get started!
*** This post contains affiliate links. If you purchase an item I have linked to, a small portion will come to me and help with the upkeep of Home Crafts by Ali. ***
Supplies needed
2 patterns of fabric - 6 inch width for each
Thin batting
Rotary Cutter
Cutting Mat
Acrylic Ruler
Water Soluble Pencil
Thread
Sewing Machine
Scissors
Iron
Directions
1. Iron your fabric. Using the rotary cutter, cut your fabric to 5-inch x 5-inch. I always but a little bit more because you can't be certain that the person cutting your fabric at the store will cut evenly. They get in a hurry sometimes and every once in a while get a little bit off when cutting your fabric.
3. Place the 2.5 x 5 inch pieces together with the pattern facing toward each other (right sides together). Sew along one long edge with a 1/4-inch seam. Use your iron to press the seam open. Generally it's best to fold the seam over to the darker material.
4. You will have a square now with one long strip on each side. Use your ruler to Cut the square in half so you will have two strips that have one block of each color. Place the strips right side together with the yellow block on one strip matching up with the brown block on the other. This will create the four square pattern.
5. Sew along a long side of the fabric with a 1/4-inch seam. Unfold and you will have your four square block.
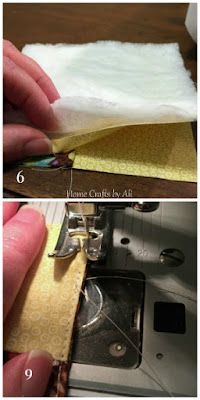
6. Next you will put the layers together. Place the back and front pieces of the coaster with right sides together. Place the batting on top of the fabric.
7. Sew around the edge with a 1/4-inch seam starting and ending with a back stitch. Leave a 3 inch space between where you began and ended so you can turn right side out.
8. Trim corners, making sure to not cut through the sewn area. Cut excess fabric from the three completely sewn sides. This will make it have a definite edge when you turn right side out.
9. Turn right side out. Since you sewed the batting, it will lay cleanly flat when you have turned this right side out. Smooth out the fabric (iron if you want), tuck the loose edge into the opening and sew closed. You will sew all the way around the edge of the coaster on all four sides. Make that seam as small as possible.
10. Use your ruler to line up between the corners. Use your water soluble pencil to lightly mark where you want to sew. If some of the pencil mark shows, you can blot gently with a damp cloth.
11. Sew along the line from corner to corner. (remember to back stitch to the thread doesn't unravel when you trim it). Turn and repeat for the other corners. To make it a little more quilted, I stitched along the lines where the small squares met.
You are done! Repeat for as many as you want to make. There might seem to be quite a few steps when you look at the tutorial, but it goes pretty fast when you are actually working on the project.
Grab your favorite drink, place your coaster on the table, and you are ready to enjoy some time to relax.
If you are interested in buying the supplies to make your own coasters (and other fun sewing projects), here are links you can use to purchase them.
I'm challenging myself this year to grow creatively and step outside my comfort zone while crafting. This year I am crafting along with other bloggers who are going to Try Something New Every Month and there is a theme for each month in 2016 to try a new way to creatively express yourself. January's theme is - Quilting. I decided to try something new, but on a small scale.
In previous projects when it was time to quilt my piece, I have only done "stitch in the ditch". Meaning I follow the line of where the fabrics have been pieced together and quilt there. This time I decided to take a risk (for me) and sew from corner to corner. Yes, it's still a straight line, but for me it was something new. I like how it creates puffy little triangles in my colorful squares. Why haven't I tried it before? It wasn't scary and my lines were straight so I really didn't have anything to worry about.
Join me in February for another new creative endeavor. My project for next the month will be a tactile craft. I have always wanted to make some of those beautiful clay beads. Paper mache projects are fun and I'm sure my girls would like to help me. So many options!
If you are interested in seeing the other projects that are created, check the hashtag #TSNEM on Instagram or check out the January link-up.


What a cute idea! Sewing corner to corner really worked well. I might have to try this myself.
ReplyDelete